
(a) HDMI
(b) DisplayPort
(c) DVI
(d) VGA/D-SUB
(e) Ethernet / RJ-45
(f) USB-A
(g) USB-C / Thunderbolt
Socket Examples if you require assistance
REFERENCES
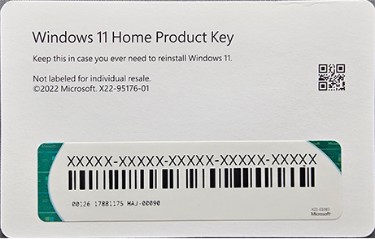

NOTE: Please refer to the examples below for your Window's Product Key.
OEM Product Key Sticker can be located on either the Top, Side, or Back of your Computer Case
Retail Product Keys are located on a card inside the Windows Retail Box inside your motherboard box.
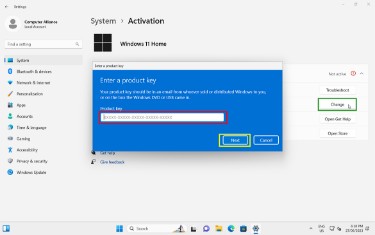
STEP 2: Click SYSTEM then click ACTIVATE NOW.
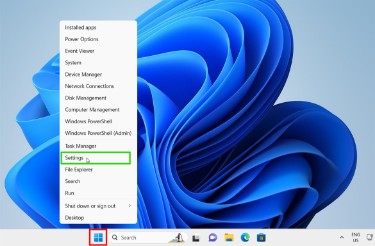
STEP 1: Right-Click on the WINDOWS BUTTON, then left-click the SETTINGS option.
WINDOWS 11 ACTIVATION
When your PC is powered on, you will need to go through the setup process to start using your PC. During the first setup you will be prompted to create/login with a Microsoft Account. If you need to create an account, you can use your existing email (Gmail, Outlook, Yahoo etc) or you can create a new address. The Microsoft Account will allow you to login a single time to sync all of your data, passwords and Microsoft Apps such as OneDrive, Edge and Office. Click Here to learn more about the advantages of a Microsoft Account.
Computer Alliance recommends using a Microsoft Account to streamline future Windows Setups and help prevent losing passwords and data.
If you would still prefer to create a "Local Account" instead of using a Microsoft Account, please Click Here [COMING SOON] to watch our advanced user guide.
Computer Alliance recommends using a Microsoft Account to streamline future Windows Setups and help prevent losing passwords and data.
If you would still prefer to create a "Local Account" instead of using a Microsoft Account, please Click Here [COMING SOON] to watch our advanced user guide.
Windows 11 Setup
Power on your PC by pressing the power button located on either the front, side or top of the case.
STEP 5: POWER ON PC
Connect mouse, keyboard and any other peripherals to the MOTHERBOARD's USB or Audio Ports.
STEP 4: PERIPHERALS
Connect cable (eg. HDMI / DisplayPort) from your monitor to the display output. If your PC has a GRAPHICS CARD, you should connect your monitors to these ports. If you don't have a graphics card, connect your monitors to the MOTHERBOARD.
STEP 3: MONITOR(S)
Screw the WI-FI Antennas into the aerial sockets. These sockets will be located either on the MOTHERBOARD or on the DEDICATED WI-FI CARD.
Note: WI-FI Antennas are included inside your motherboard box. If your PC does not have WI-FI, you will need to connect an ethernet cable from your router to your PCs ethernet port.
Note: WI-FI Antennas are included inside your motherboard box. If your PC does not have WI-FI, you will need to connect an ethernet cable from your router to your PCs ethernet port.
STEP 2: WI-FI
Take the power supply cable supplied in your motherboard box and plug it into the Power Supply Socket.
STEP 1: POWER
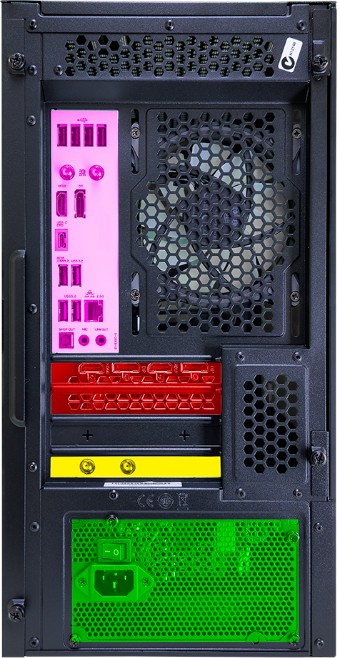
Please reference this colour coded diagram of the back of a PC while completing Steps 1-5.
Plug in your Devices
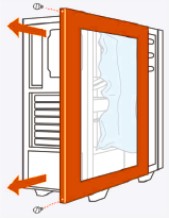
Perform step one backwards by putting the side panel back on and screwing the screws in finger-tight.
STEP 3
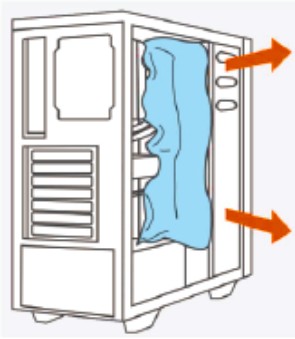
Gently remove the packing foam from between the components. It's good practice to check over the cables and make sure removing the foam didn't unplug anything.
STEP 2
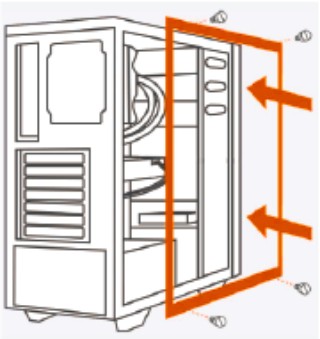
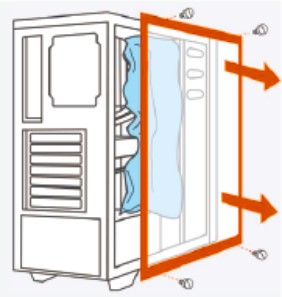
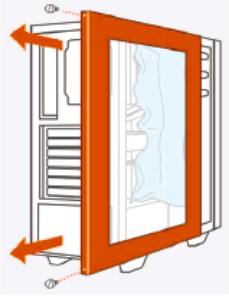
Unscrew the screws holding the side panel in place. After removing the screws, carefully lift or slide the side panel away from the case.
STEP 1
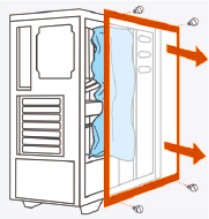
If you PC was collected from our store, you can skip this step!
If your PC was shipped to you, and contains large components (eg. graphics card, aftermarket CPU cooler) chances are we've put packing foam inside your case to protect your components. Please follow the steps below to remove the packing foam.
If your PC was shipped to you, and contains large components (eg. graphics card, aftermarket CPU cooler) chances are we've put packing foam inside your case to protect your components. Please follow the steps below to remove the packing foam.
Was your PC Collected or Shipped?
If you wish to read through the guide, step-by-step, please keep scrolling. Otherwise, click below to watch our video tutorial
Setting up your New PC
Your New PC
Congratulations on your purchase of a Computer Alliance PC! Your new PC was assembled, tested and updated with care and consideration, by our team of expert technicians with many years of experience building computers.
We’ve created this simple guide to assist you in setting up your new computer. If you still experience issues, please phone our service centre on (07) 3421 3200 and select “2” for service. Our Service Centre’s technical support hours are: Monday - Friday: 9am - 6pm
We’ve created this simple guide to assist you in setting up your new computer. If you still experience issues, please phone our service centre on (07) 3421 3200 and select “2” for service. Our Service Centre’s technical support hours are: Monday - Friday: 9am - 6pm
(a) HDMI
(b) DisplayPort
(c) DVI
(d) VGA/D-SUB
(e) Ethernet / RJ-45
(f) USB-A
(g) USB-C / Thunderbolt
Socket Examples if you require assistance
REFERENCES
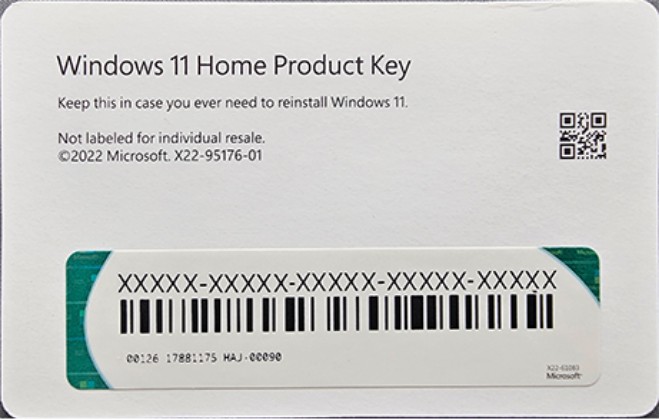

NOTE: Please refer to the examples below for your Window's Product Key.
OEM Product Key Sticker can be located on either the Top, Side, or Back of your Computer Case
Retail Product Keys are located on a card inside the Windows Retail Box inside your motherboard box.
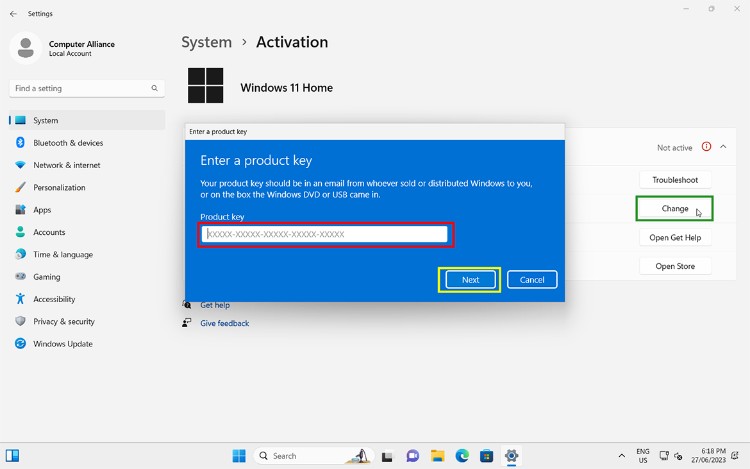
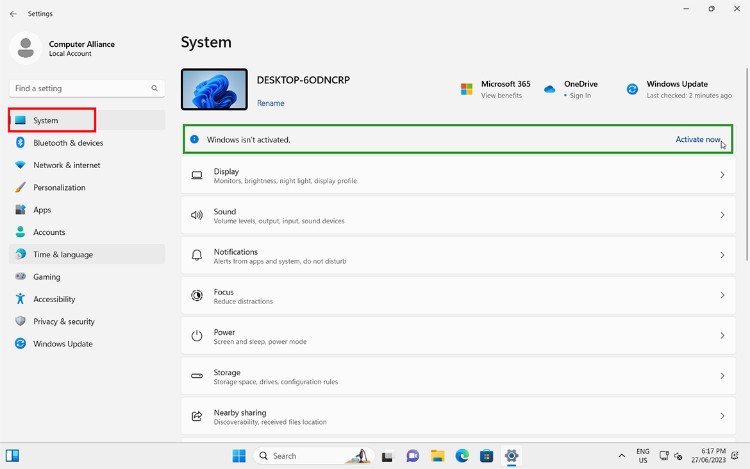
STEP 2: Click SYSTEM then click ACTIVATE NOW.
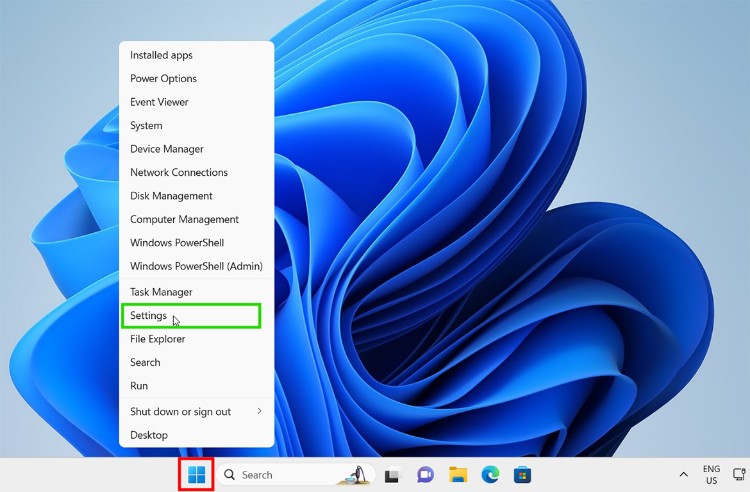
STEP 1: Right-Click on the WINDOWS BUTTON, then left-click the SETTINGS option.
WINDOWS 11 ACTIVATION
When your PC is powered on, you will need to go through the setup process to start using your PC. During the first setup you will be prompted to create/login with a Microsoft Account. If you need to create an account, you can use your existing email (Gmail, Outlook, Yahoo etc) or you can create a new address. The Microsoft Account will allow you to login a single time to sync all of your data, passwords and Microsoft Apps such as OneDrive, Edge and Office. Click Here to learn more about the advantages of a Microsoft Account.
Computer Alliance recommends using a Microsoft Account to streamline future Windows Setups and help prevent losing passwords and data.
If you would still prefer to create a "Local Account" instead of using a Microsoft Account, please Click Here [COMING SOON] to watch our advanced user guide.
Computer Alliance recommends using a Microsoft Account to streamline future Windows Setups and help prevent losing passwords and data.
If you would still prefer to create a "Local Account" instead of using a Microsoft Account, please Click Here [COMING SOON] to watch our advanced user guide.
Windows 11 Setup
Power on your PC by pressing the power button located on either the front, side or top of the case.
STEP 5: POWER ON PC
Connect mouse, keyboard and any other peripherals to the MOTHERBOARD's USB or Audio Ports.
STEP 4: PERIPHERALS
Connect cable (eg. HDMI / DisplayPort) from your monitor to the display output. If your PC has a GRAPHICS CARD, you should connect your monitors to these ports. If you don't have a graphics card, connect your monitors to the MOTHERBOARD.
STEP 3: MONITOR(S)
Screw the WI-FI Antennas into the aerial sockets. These sockets will be located either on the MOTHERBOARD or on the DEDICATED WI-FI CARD.
Note: WI-FI Antennas are included inside your motherboard box. If your PC does not have WI-FI, you will need to connect an ethernet cable from your router to your PCs ethernet port.
Note: WI-FI Antennas are included inside your motherboard box. If your PC does not have WI-FI, you will need to connect an ethernet cable from your router to your PCs ethernet port.
STEP 2: WI-FI
Take the power supply cable supplied in your motherboard box and plug it into the Power Supply Socket.
STEP 1: POWER
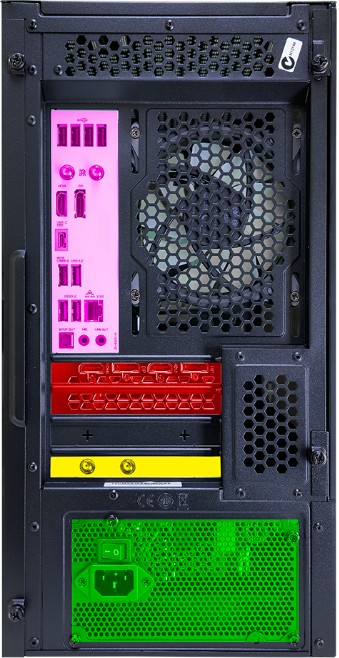
Please reference this colour coded diagram of the back of a PC while completing Steps 1-5.
Plug in your Devices
Perform step one backwards by putting the side panel back on and screwing the screws in finger-tight.
STEP 3
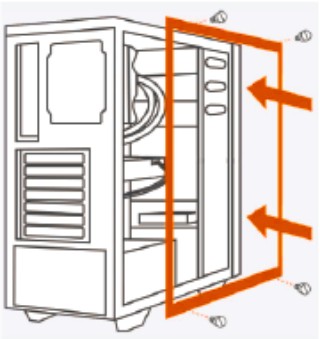
Gently remove the packing foam from between the components. It's good practice to check over the cables and make sure removing the foam didn't unplug anything.
STEP 2
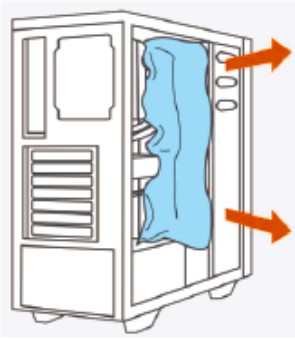
Unscrew the screws holding the side panel in place. After removing the screws, carefully lift or slide the side panel away from the case.
STEP 1
If you PC was collected from our store, you can skip this step!
If your PC was shipped to you, and contains large components (eg. graphics card, aftermarket CPU cooler) chances are we've put packing foam inside your case to protect your components. Please follow the steps below to remove the packing foam.
If your PC was shipped to you, and contains large components (eg. graphics card, aftermarket CPU cooler) chances are we've put packing foam inside your case to protect your components. Please follow the steps below to remove the packing foam.
Was your PC Collected or Shipped?
If you wish to read through the guide, step-by-step, please keep scrolling. Otherwise, click below to watch our video tutorial
Setting up your New PC
Your New PC
Congratulations on your purchase of a Computer Alliance PC! Your new PC was assembled, tested and updated with care and consideration, by our team of expert technicians with many years of experience building computers.
We’ve created this simple guide to assist you in setting up your new computer. If you still experience issues, please phone our service centre on (07) 3421 3200 and select “2” for service. Our Service Centre’s technical support hours are: Monday - Friday: 9am - 6pm
We’ve created this simple guide to assist you in setting up your new computer. If you still experience issues, please phone our service centre on (07) 3421 3200 and select “2” for service. Our Service Centre’s technical support hours are: Monday - Friday: 9am - 6pm
(a) HDMI
(b) DisplayPort
(c) DVI
(d) VGA/D-SUB
(e) Ethernet / RJ-45
(f) USB-A
(g) USB-C / Thunderbolt
Socket Examples if you require assistance
REFERENCES
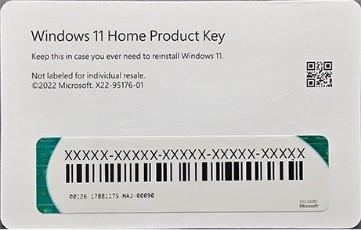

NOTE: Please refer to the examples below for your Window's Product Key.
OEM Product Key Sticker can be located on either the Top, Side, or Back of your Computer Case
Retail Product Keys are located on a card inside the Windows Retail Box inside your motherboard box.
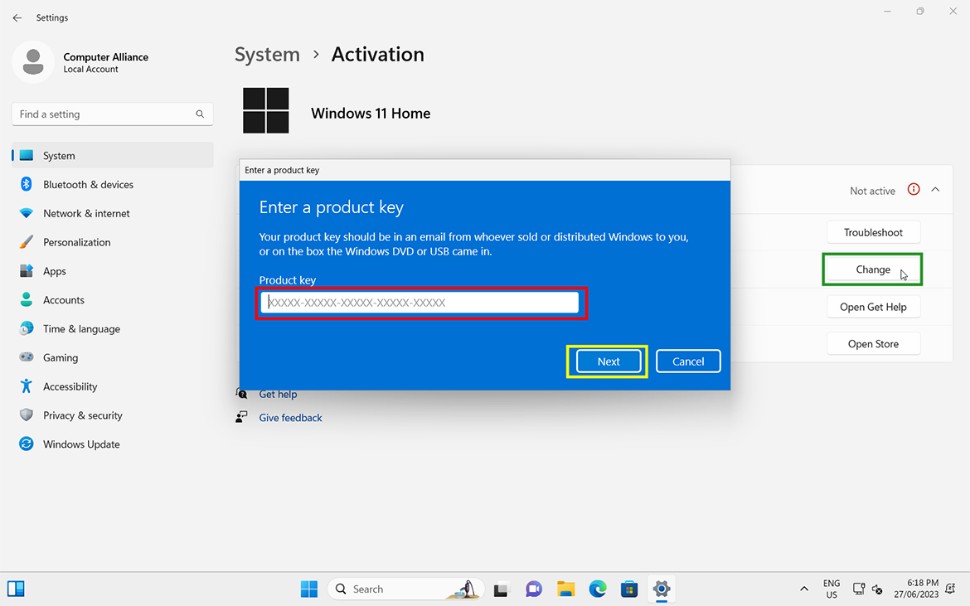
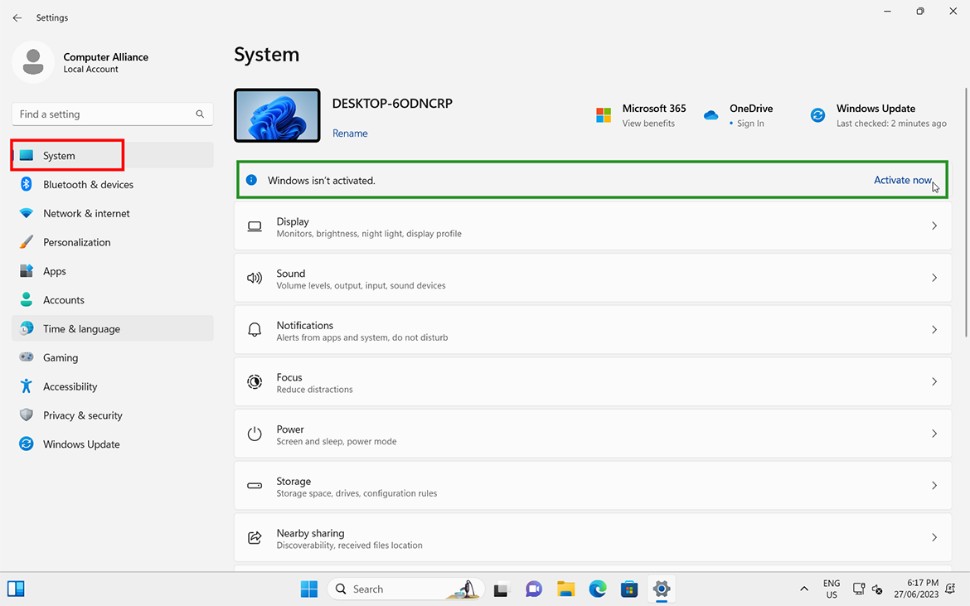
STEP 2: Click SYSTEM then click ACTIVATE NOW.
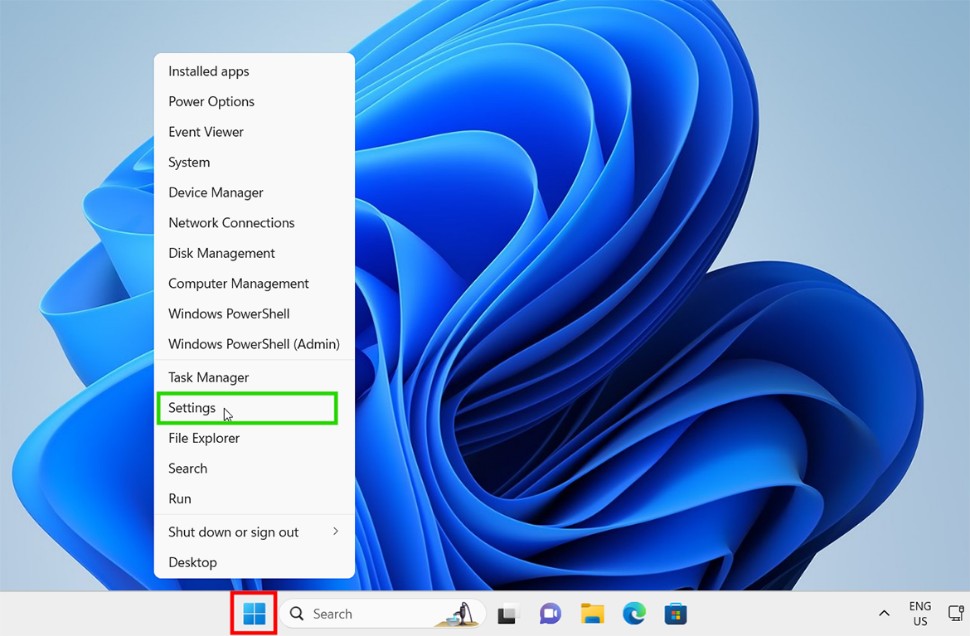
STEP 1: Right-Click on the WINDOWS BUTTON, then left-click the SETTINGS option.
WINDOWS 11 ACTIVATION
When your PC is powered on, you will need to go through the setup process to start using your PC. During the first setup you will be prompted to create/login with a Microsoft Account. If you need to create an account, you can use your existing email (Gmail, Outlook, Yahoo etc) or you can create a new address. The Microsoft Account will allow you to login a single time to sync all of your data, passwords and Microsoft Apps such as OneDrive, Edge and Office. Click Here to learn more about the advantages of a Microsoft Account.
Computer Alliance recommends using a Microsoft Account to streamline future Windows Setups and help prevent losing passwords and data.
If you would still prefer to create a "Local Account" instead of using a Microsoft Account, please Click Here [COMING SOON] to watch our advanced user guide.
Computer Alliance recommends using a Microsoft Account to streamline future Windows Setups and help prevent losing passwords and data.
If you would still prefer to create a "Local Account" instead of using a Microsoft Account, please Click Here [COMING SOON] to watch our advanced user guide.
Windows 11 Setup
Power on your PC by pressing the power button located on either the front, side or top of the case.
STEP 5: POWER ON PC
Connect mouse, keyboard and any other peripherals to the MOTHERBOARD's USB or Audio Ports.
STEP 4: PERIPHERALS
Connect cable (eg. HDMI / DisplayPort) from your monitor to the display output. If your PC has a GRAPHICS CARD, you should connect your monitors to these ports. If you don't have a graphics card, connect your monitors to the MOTHERBOARD.
STEP 3: MONITOR(S)
Screw the WI-FI Antennas into the aerial sockets. These sockets will be located either on the MOTHERBOARD or on the DEDICATED WI-FI CARD.
Note: WI-FI Antennas are included inside your motherboard box. If your PC does not have WI-FI, you will need to connect an ethernet cable from your router to your PCs ethernet port.
Note: WI-FI Antennas are included inside your motherboard box. If your PC does not have WI-FI, you will need to connect an ethernet cable from your router to your PCs ethernet port.
STEP 2: WI-FI
Take the power supply cable supplied in your motherboard box and plug it into the Power Supply Socket.
STEP 1: POWER
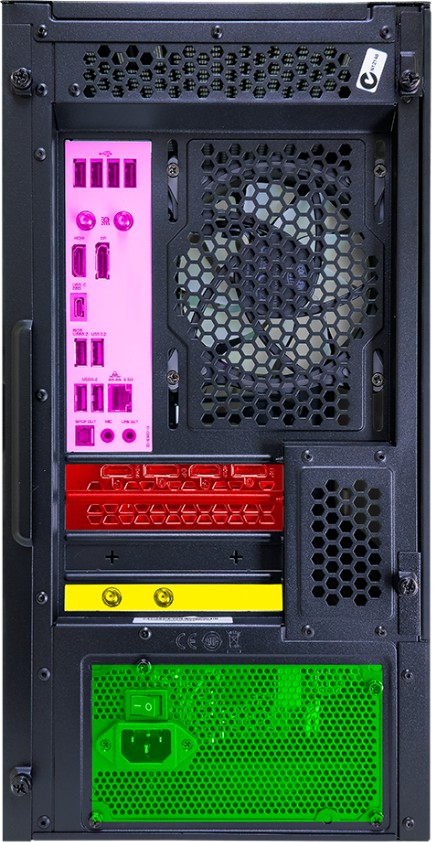
Please reference this colour coded diagram of the back of a PC while completing Steps 1-5.
Plug in your Devices
Perform step one backwards by putting the side panel back on and screwing the screws in finger-tight.
STEP 3
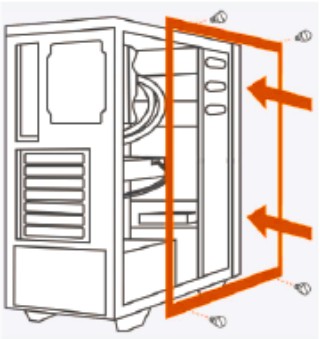
Gently remove the packing foam from between the components. It's good practice to check over the cables and make sure removing the foam didn't unplug anything.
STEP 2
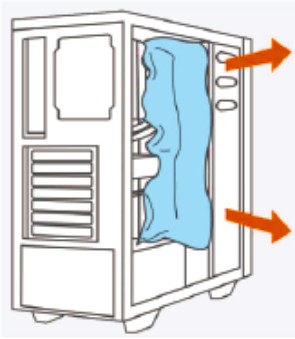
Unscrew the screws holding the side panel in place. After removing the screws, carefully lift or slide the side panel away from the case.
STEP 1
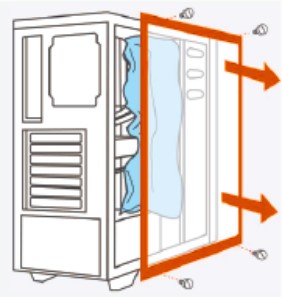
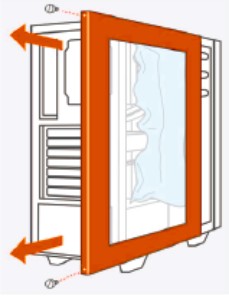
If you PC was collected from our store, you can skip this step!
If your PC was shipped to you, and contains large components (eg. graphics card, aftermarket CPU cooler) chances are we've put packing foam inside your case to protect your components. Please follow the steps below to remove the packing foam.
If your PC was shipped to you, and contains large components (eg. graphics card, aftermarket CPU cooler) chances are we've put packing foam inside your case to protect your components. Please follow the steps below to remove the packing foam.
Was your PC Collected or Shipped?
If you wish to read through the guide, step-by-step, please keep scrolling. Otherwise, click below to watch our video tutorial
Setting up your New PC
Your New PC
Congratulations on your purchase of a Computer Alliance PC! Your new PC was assembled, tested and updated with care and consideration, by our team of expert technicians with many years of experience building computers.
We’ve created this simple guide to assist you in setting up your new computer. If you still experience issues, please phone our service centre on (07) 3421 3200 and select “2” for service. Our Service Centre’s technical support hours are: Monday - Friday: 9am - 6pm
We’ve created this simple guide to assist you in setting up your new computer. If you still experience issues, please phone our service centre on (07) 3421 3200 and select “2” for service. Our Service Centre’s technical support hours are: Monday - Friday: 9am - 6pm
(a) HDMI
(b) DisplayPort
(c) DVI
(d) VGA/D-SUB
(e) Ethernet / RJ-45
(f) USB-A
(g) USB-C / Thunderbolt
Socket Examples if you require assistance
REFERENCES
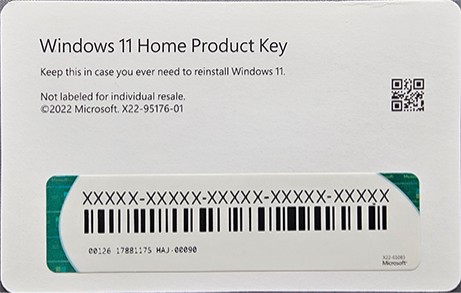

NOTE: Please refer to the examples below for your Window's Product Key.
OEM Product Key Sticker can be located on either the Top, Side, or Back of your Computer Case
Retail Product Keys are located on a card inside the Windows Retail Box inside your motherboard box.
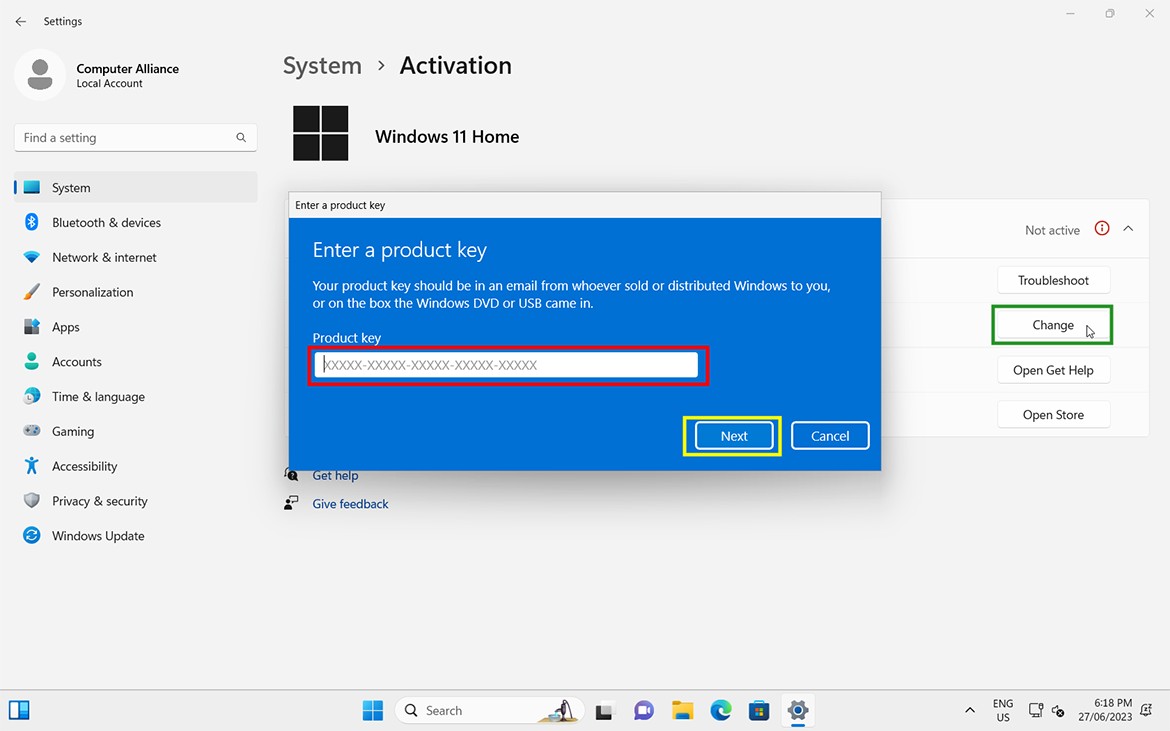
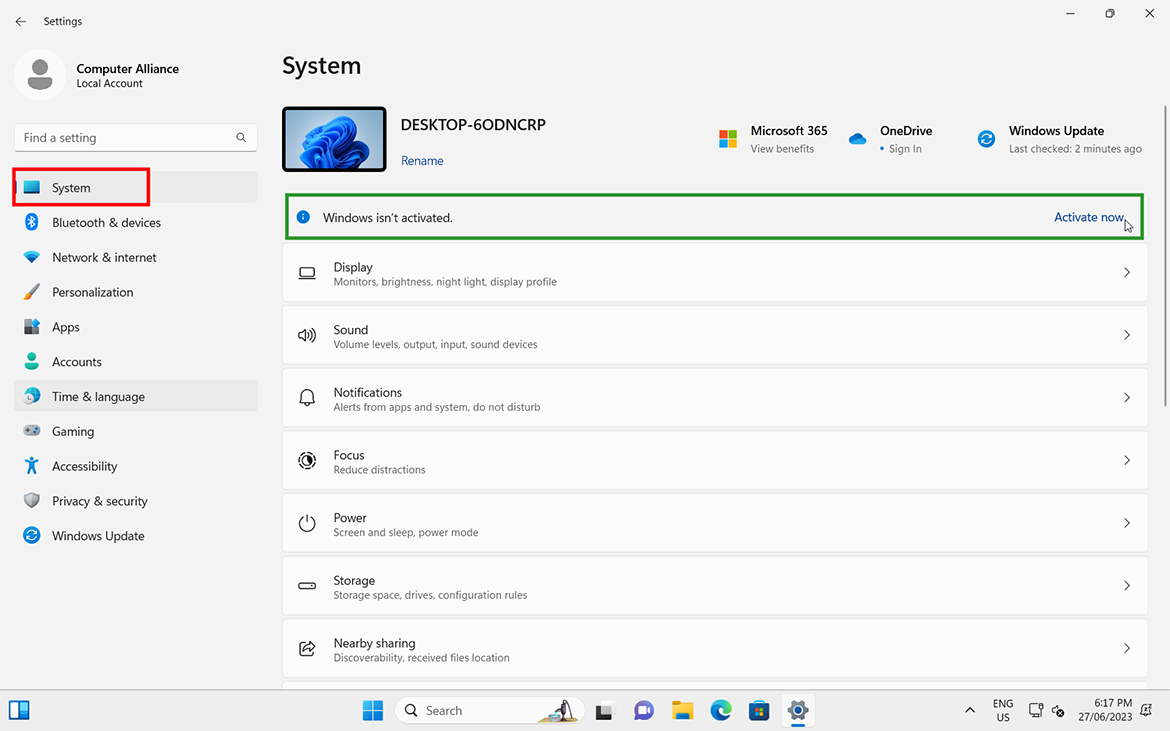
STEP 2: Click SYSTEM then click ACTIVATE NOW.
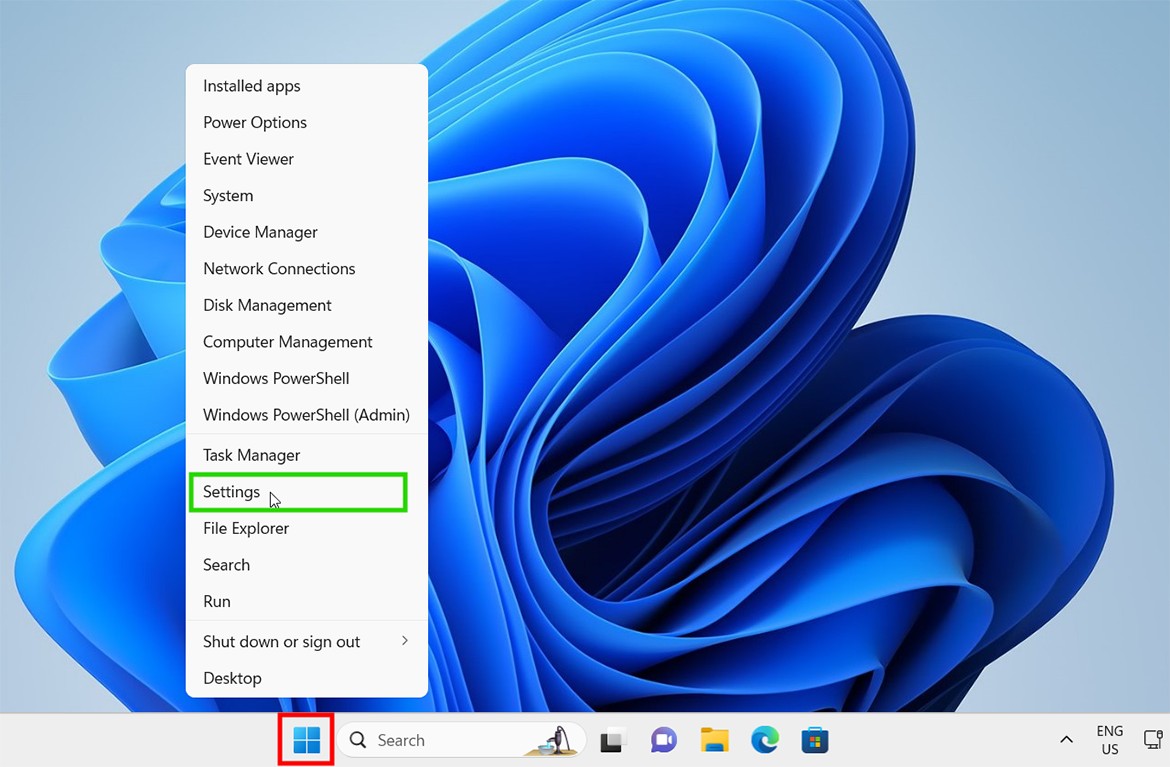
STEP 1: Right-Click on the WINDOWS BUTTON, then left-click the SETTINGS option.
WINDOWS 11 ACTIVATION
When your PC is powered on, you will need to go through the setup process to start using your PC. During the first setup you will be prompted to create/login with a Microsoft Account. If you need to create an account, you can use your existing email (Gmail, Outlook, Yahoo etc) or you can create a new address. The Microsoft Account will allow you to login a single time to sync all of your data, passwords and Microsoft Apps such as OneDrive, Edge and Office. Click Here to learn more about the advantages of a Microsoft Account.
Computer Alliance recommends using a Microsoft Account to streamline future Windows Setups and help prevent losing passwords and data.
If you would still prefer to create a "Local Account" instead of using a Microsoft Account, please Click Here [COMING SOON] to watch our advanced user guide.
Computer Alliance recommends using a Microsoft Account to streamline future Windows Setups and help prevent losing passwords and data.
If you would still prefer to create a "Local Account" instead of using a Microsoft Account, please Click Here [COMING SOON] to watch our advanced user guide.
Windows 11 Setup
Power on your PC by pressing the power button located on either the front, side or top of the case.
STEP 5: POWER ON PC
Connect mouse, keyboard and any other peripherals to the MOTHERBOARD's USB or Audio Ports.
STEP 4: PERIPHERALS
Connect cable (eg. HDMI / DisplayPort) from your monitor to the display output. If your PC has a GRAPHICS CARD, you should connect your monitors to these ports. If you don't have a graphics card, connect your monitors to the MOTHERBOARD.
STEP 3: MONITOR(S)
Screw the WI-FI Antennas into the aerial sockets. These sockets will be located either on the MOTHERBOARD or on the DEDICATED WI-FI CARD.
Note: WI-FI Antennas are included inside your motherboard box. If your PC does not have WI-FI, you will need to connect an ethernet cable from your router to your PCs ethernet port.
Note: WI-FI Antennas are included inside your motherboard box. If your PC does not have WI-FI, you will need to connect an ethernet cable from your router to your PCs ethernet port.
STEP 2: WI-FI
Take the power supply cable supplied in your motherboard box and plug it into the Power Supply Socket.
STEP 1: POWER
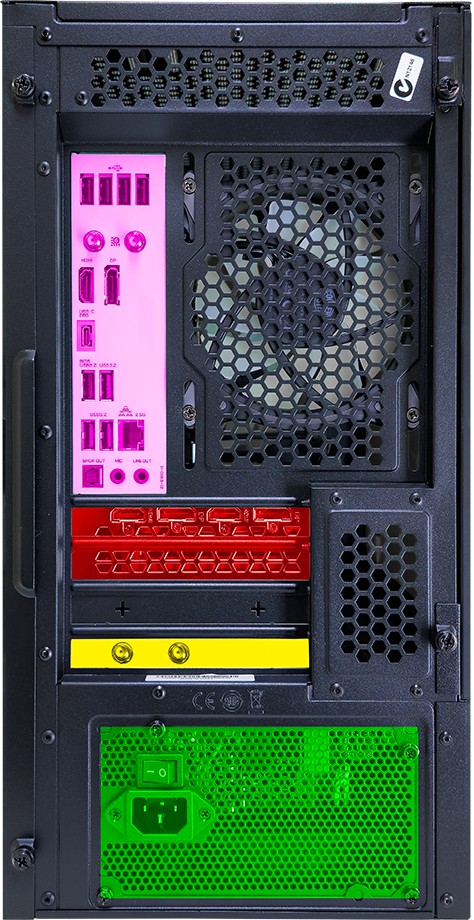
Please reference this colour coded diagram of the back of a PC while completing Steps 1-5.
Plug in your Devices
Perform step one backwards by putting the side panel back on and screwing the screws in finger-tight.
STEP 3
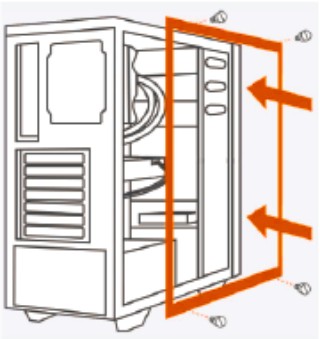
Gently remove the packing foam from between the components. It's good practice to check over the cables and make sure removing the foam didn't unplug anything.
STEP 2
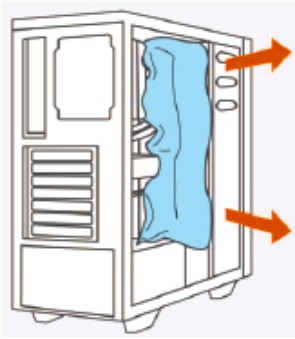
Unscrew the screws holding the side panel in place. After removing the screws, carefully lift or slide the side panel away from the case.
STEP 1
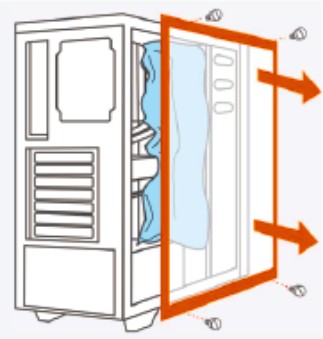
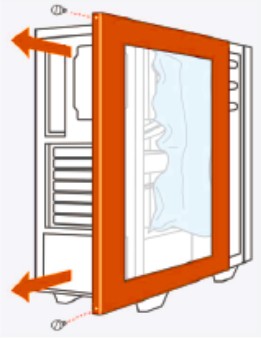
If you PC was collected from our store, you can skip this step!
If your PC was shipped to you, and contains large components (eg. graphics card, aftermarket CPU cooler) chances are we've put packing foam inside your case to protect your components. Please follow the steps below to remove the packing foam.
If your PC was shipped to you, and contains large components (eg. graphics card, aftermarket CPU cooler) chances are we've put packing foam inside your case to protect your components. Please follow the steps below to remove the packing foam.
Was your PC Collected or Shipped?
If you wish to read through the guide, step-by-step, please keep scrolling. Otherwise, click below to watch our video tutorial
Setting up your New PC
Your New PC
Congratulations on your purchase of a Computer Alliance PC! Your new PC was assembled, tested and updated with care and consideration, by our team of expert technicians with many years of experience building computers.
We’ve created this simple guide to assist you in setting up your new computer. If you still experience
issues, please phone our service centre on (07) 3421 3200 and select “2” for service. Our Service
Centre’s technical support hours are: Monday - Friday: 9am - 6pm
We’ve created this simple guide to assist you in setting up your new computer. If you still experience
issues, please phone our service centre on (07) 3421 3200 and select “2” for service. Our Service
Centre’s technical support hours are: Monday - Friday: 9am - 6pm

